
Main content:
- Battery Terminal Clamp Materials and Structure
- Common Damage Phenomena of Battery Terminal Clamps
- Common Causes of Corrosion in Terminal Clamps
- How to Clean Corroded Battery Terminals
- Tools and Materials Required for Replacing Battery Terminal Clamp
-
How to Replace Battery Terminal Clamp
- Step 1: Maintain System Memory
- Step 2: Clean Battery Terminals and Wiring Area
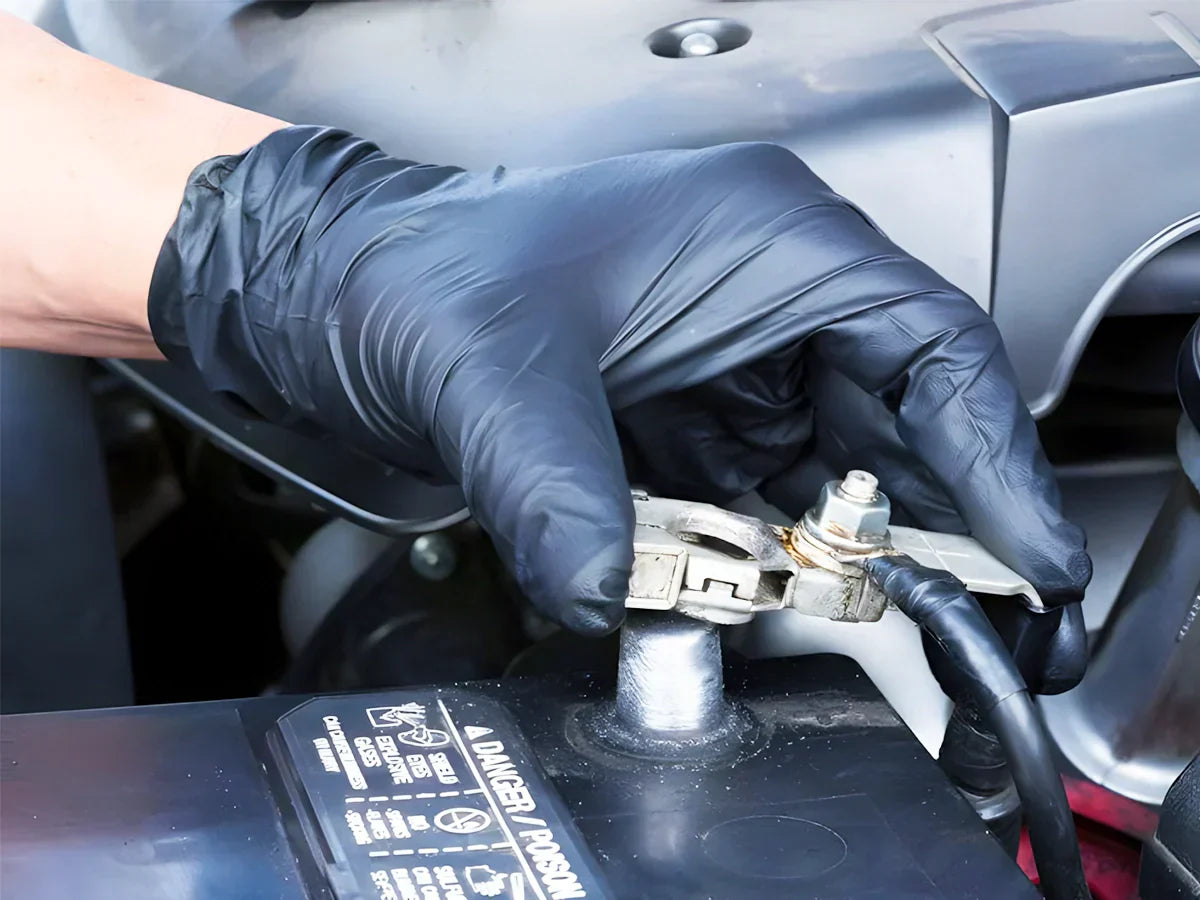
- Step 3: Remove the Old Terminal Clamp
- Step 4: Install the New Terminal Clamp
- Step 5: Connect the Terminal Clamps in the Correct Order
- Step 6: Corrosion Prevention and Insulation Treatment
- Step 7: Check Battery Connection Status
- Battery Terminal Clamp Testing and Maintenance Tips
- When to Call a Pro
- FAQs
Battery terminal clamps are a crucial connection point in a vehicle's electrical system, directly affecting starting performance and electronic functionality. Learning how to replace the battery terminal clamp can extend battery life and prevent electrical issues. This guide explains clamp materials, corrosion causes, cleaning methods, installation steps, and safety precautions, empowering vehicle owners to effectively maintain their battery system.
Battery Terminal Clamp Materials and Structure

Battery terminal clamps are typically made of galvanized steel, copper, or lead alloys, with an anti-corrosion coating. The battery terminal clamp is a vital component connecting the battery to the vehicle's electrical system; its material affects not only conductivity but also corrosion resistance and lifespan.
Copper Terminal Clamps
Copper has excellent conductivity and is a commonly used high-performance material in battery terminal clamps. Copper clamps achieve efficient conduction with low contact resistance, reducing energy loss, and are highly corrosion-resistant, not easily oxidized by moisture or electrochemical reactions.
Many high-end automobiles, electric vehicles, and energy storage devices use copper clamps to ensure stable electrical performance. Learning how to replace the battery terminal clamp is especially important when using copper clamps because improper installation can easily deform the soft metal.
Galvanized Steel Clamps
Galvanized steel clamps offer good mechanical strength and cost advantages. The outer zinc coating effectively prevents steel oxidation and rust, extending its service life. Although steel's conductivity is not as high as copper, galvanized steel clamps remain an economical and reliable choice for systems with low current requirements, such as those used in automobiles and motorcycles. It's important to note that prolonged use can damage the coating, exposing the steel and accelerating corrosion; therefore, regular inspection and cleaning of the wiring areas are essential.
Lead Alloy Clamps
Lead alloys are a traditional material for battery clamps, possessing excellent corrosion resistance and a certain degree of ductility, maintaining stable contact even at high temperatures. Lead alloy terminal clamps are commonly used in lead-acid battery systems, especially in large energy storage devices or industrial power supplies.
Their disadvantages include heavy weight and poor environmental performance, and they have been gradually replaced by lighter and more environmentally friendly copper or alloy materials in recent years.
Structural Design and Protective Coating
Besides the material, the structural design of the terminal clamp is equally crucial. High-quality terminal clamps typically employ die-casting or forging structures to ensure uniform clamping force and stable contact surfaces.
Simultaneously, an anti-corrosion coating or electroplating layer is added to the surface to prevent oxidation caused by battery electrolyte or moisture. Some models use insulating sleeves or quick-connect structures for easy installation, making how to replace the battery terminal clamp straightforward for DIY vehicle maintenance.
Common Damage Phenomena of Battery Terminal Clamps

- Severe corrosion that cannot be cleaned
- Metal cracks, wear, or deformation
- Poor contact leading to unstable voltage
- Starting difficulties, electrical system malfunctions
Externally visible corrosion is often easy to detect and clean, but internal, hidden corrosion is more dangerous. Internal oxidation of the terminal clamp reduces the conductive area and increases resistance, leading to decreased generator output, excessive starter load, and even damage to the ECM (Engine Control Module) or air conditioning control module. This potential problem usually doesn't manifest immediately, but it can lead to degraded electrical system performance or intermittent failures over prolonged use.
Common Causes of Corrosion in Terminal Clamps

Electrolytic Reaction
During lead-acid battery operation, the hydrogen gas released by the battery reacts with moisture in the air and road salts, generating sulfates or oxides around the terminal clamps. These white or bluish-green crystalline substances not only affect conductivity but also further corrode metal surfaces, causing poor contact.
Electrolyte Leakage
If the battery casing leaks acid due to aging, cracking, or overcharging, the acidic electrolyte will spread along cables or terminals, corroding metal components. If not cleaned promptly, corrosion will gradually penetrate into the terminal clamp, eventually leading to metal fatigue or structural fracture.
Environmental Factors
High humidity, high temperature, salt spray, or dusty environments accelerate metal oxidation. Especially in coastal areas or on roads salted in winter, the high salt content in the air creates a strong electrolytic medium, accelerating the corrosion reaction. In addition, frequent temperature changes can cause metal to expand and contract, resulting in microcracks and further spreading corrosion.
How to Clean Corroded Battery Terminals
- Ensure the car is off to reduce the possibility of accidental grounding of the cables.
- Determine the battery terminal configuration. There are two types of battery terminals. If the terminals are on the side, use a 5/16-inch (8 mm) wrench to loosen the cable nut. If the terminals are on the top of the battery, use a 3/8-inch (10 mm) or 1/2-inch (13 mm) wrench.
- Loosen the nut on the negative (-) cable clamp to disconnect the cable from the terminal. Loosen the positive (+) cable in the same way. If you have difficulty disconnecting the positive or negative cable, try twisting the cable slightly while pulling.
- Check the battery for cracks and acid leaks. If cracks and acid leaks are found, the battery needs to be replaced.
- Check the battery cables and cable clamps for tears. If the tears are severe, the component needs to be replaced.
- Mix 1 tablespoon (15 ml) of baking soda with 1 cup (250 ml) of boiling water. Use an old toothbrush dipped in the solution to scrub the top of the battery to remove accumulated rust. You can even immerse the ends of the battery cables in hot water to dissolve the rust.
- Scrub the battery clamps and terminals with a toothbrush. Dip the toothbrush in the baking soda solution as needed.
- Rinse the battery and cables with cold water. Make sure all the baking soda and rust are rinsed off. Dry the battery and clamps with a clean cloth.
- Apply lubricant to the exposed metal parts of the battery terminals, posts, and clamps. Use petroleum jelly or a commercial battery terminal protectant spray.
- Reconnect the positive (+) cable clamp to the correct terminal. Tighten the nut with a wrench, and also reconnect the negative (-) cable clamp, hand-tightening each terminal to check for a secure fit.
Tools and Materials Required for Replacing Battery Terminal Clamp

Preparing appropriate tools and materials before replacing battery terminal clamps can improve safety and work efficiency.
Tools:
- Wrenches or socket sets (commonly 10mm) for loosening the retaining nuts.
- Cable cutters/wire strippers for cutting and stripping cable sheaths.
- Wire brush/battery terminal cleaner for effectively removing corrosion.
- Sandpaper (120 grit) for finely polishing contact surfaces.
- DVOM (Dielectric Value Oxide Meter) for testing battery voltage and resistance.
- Heat gun or hair dryer for heating heat shrink tubing for sealing.
- Battery Memory Saver: Maintains the vehicle system's memory during replacement.
- Screwdriver, pliers, safety gloves, and safety goggles are necessary for safe operation.
Materials:
Tin-plated copper compression type terminal clamps are recommended. This material has good conductivity and excellent corrosion resistance.
In addition, anti-corrosion gaskets and terminal protective covers (red/black) are required for post-construction protection. Vaseline or dielectric grease can be used for terminal surface insulation protection. Baking soda + aqueous solution is used to neutralize acid and remove corrosion.
A cloth, paper towel, and distilled water are used to clean residual liquid. Anti-corrosion spray or terminal grease can also be used for further enhanced protection.
How to Replace Battery Terminal Clamp
Step 1: Maintain System Memory
If the vehicle is equipped with an audio, ECM, or clock system, a memory power-saving device should be inserted into the 12V socket before replacing the battery terminal clamps to prevent system data loss. This operation prevents the onboard computer, time, and audio settings from being reset.
Step 2: Clean Battery Terminals and Wiring Area
Prepare a baking soda solution to neutralize acidic corrosion at the battery terminals. Use a wire brush or terminal cleaner to thoroughly clean away dirt, ensuring the contact surfaces are clean and free of residue. After cleaning, rinse thoroughly with distilled water and then completely dry with a towel or paper towel to prevent moisture residue from causing new oxidation.
Step 3: Remove the Old Terminal Clamp
Use a wrench to loosen the retaining nut and carefully remove the old terminal clamp. If you need to cut the old cable, ensure the battery is completely disconnected to prevent arcing or short circuits. If the copper wire surface is blackened or turned green, clean it with a baking soda solution and then thoroughly dry it with a heat gun to restore conductivity.
Step 4: Install the New Terminal Clamp
Use wire strippers to remove approximately 1/2 inch of insulation, exposing clean copper wire. First, slip the heat shrink tubing and protective cover onto the cable, then insert the copper wire into the compressed end of the new terminal clamp. Tighten the retaining screw to ensure a 360° tight contact between the wire and the clamp. Then, use a heat gun to heat the heat shrink tubing to ensure it adheres tightly to the cable surface, forming a good seal.
Step 5: Connect the Terminal Clamps in the Correct Order
The installation order should be positive (red +) first, then negative (black -). Gently wiggle the terminal clamp by hand to confirm a secure and reliable contact. Do not overtighten to avoid damaging the battery terminals or deforming the clamp. Step 6: Corrosion Prevention and Insulation Treatment
Step 6: Corrosion Prevention and Insulation Treatment
Apply a thin layer of petroleum jelly or dielectric grease evenly to the contact surfaces of the terminal clamp and battery terminals. This effectively isolates the battery from air and moisture, preventing oxidation and corrosion. Then install the anti-corrosion gaskets and red/black protective covers to enhance protection and facilitate polarity identification.
Step 7: Check Battery Connection Status
Use a digital voltmeter (DVOM) to check the battery status. The normal static voltage should be around 12.6V. A negative reading indicates that the test leads are reversed. Next, perform a resistance test. Ideally, the result should be between 0.000 and 0.002Ω. If it exceeds 0.005Ω, it indicates poor contact, and the terminal clamp should be readjusted or the wire crimping should be checked.
Battery Terminal Clamp Testing and Maintenance Tips

After replacing the battery terminal clamp, regular testing and maintenance are crucial for ensuring the stable operation of the vehicle's electrical system. Good maintenance habits not only extend the lifespan of the battery and terminal clamp but also effectively prevent potential faults such as starting difficulties and voltage instability.
First, start the vehicle and observe whether the electrical system is functioning properly, including headlight brightness, instrument panel display, and audio system response. If everything is normal, the terminal clamps are securely installed and making good contact.
It is recommended to check the tightness and cleanliness of the terminal clamps every 3–6 months. After prolonged use, vibration or temperature changes may cause slight loosening of the connections, affecting conductivity. During inspection, gently wiggle the terminal clamps; if they feel loose, tighten the nuts immediately.
If slight corrosion is found, clean the terminal surface with a baking soda solution and then wipe it dry with a clean towel; there is no need to disassemble the terminal clamps. In humid or winter environments, high humidity and salt content can easily cause metal to oxidize. In such cases, regularly apply anti-corrosion grease or dielectric grease to form a protective film.
If the vehicle experiences voltage drop or difficulty starting, it may be due to poor contact or internal oxidation of the terminal clamps. In this case, use a digital voltmeter (DVOM) to check the voltage and resistance, and clean or replace the terminals if necessary. Maintaining low impedance in electrical connections is crucial for ensuring stable engine starting.
When to Call a Pro
While replacing battery connectors is a basic maintenance task, in some situations, even if you know how to replace the battery terminal clamp, certain conditions require professional attention to avoid short circuits, shocks, or chemical burns.
If you are unfamiliar with the structure and operation of the vehicle's electrical system, operating it without disconnecting the power may result in a short circuit or electric shock risk; this should be handled by a professional.
When cables are found to be too short or severely corroded internally, cable extension or replacement is necessary. This involves wire crimping, insulation, and protective encapsulation, and should not be attempted by yourself.
If the battery itself or the vehicle's electronic control module (ECM) is damaged, such as due to voltage insufficiency, abnormal charging, or system alarms, diagnosis and repair must be performed by a service center equipped with diagnostic equipment.
Furthermore, if you lack appropriate tools or safety equipment (such as safety goggles, insulated gloves, and a digital multimeter), it is not recommended to attempt the procedure yourself to avoid accidental short circuits or chemical burns.
FAQs
How to fix a loose battery terminal clamp?
A loose terminal clamp can cause poor contact, affecting starting and the electrical system. First, disconnect the negative battery terminal, then tighten the clamp nut with a wrench to ensure a secure grip on the battery terminal. If the clamp is aged or severely corroded, replace it with a new one and apply anti-corrosion treatment to ensure stable conductivity.
Can aluminum foil fix a loose battery terminal?
Aluminum foil can temporarily fill the gap between the clamp and the battery terminal, increasing the contact area and improving conductivity in the short term. However, aluminum oxidizes easily, and long-term use will increase resistance. It is only suitable for emergency use and cannot replace proper replacement or repair.
Can the battery terminal post be replaced?
Battery terminals are replaceable parts, especially when severely corroded or damaged. Usually, the battery needs to be disconnected, the old terminal removed, and a new terminal installed. Ensure good contact between the terminal clamp and the terminal, and apply an anti-corrosion agent to extend its lifespan.
Do you attach red or black first?
The correct order is to connect the positive terminal (red +) first, then the negative terminal (black -). Disassembly should be performed in the reverse order: disconnect the negative terminal first, then the positive terminal. Following this order can prevent short circuits, arcing, or damage to electrical equipment, and ensure operational safety.