

Main content:
- Why Battery Testing Is Important
- Signs Your Motorcycle Battery Needs Testing
- Tools You'll Need for Battery Testing
- Key Parameters for Testing
- Step-by-Step To Testing Motorcycle Battery with a Multimeter And Understanding the Results
- How Swap Stations Test Motorcycle Batteries?
- Testing with a Battery Load Tester
- Common Mistakes to Avoid When Testing
- Conclusion
A motorcycle battery may be small, but it plays a massive role in your bike’s overall performance. Without it, you’d have trouble starting the engine, powering your lights, or running accessories. That’s why testing motorcycle battery health regularly is crucial if you want reliable rides and fewer roadside headaches.
In this article, we’ll explore why battery testing matters, when to do it, the tools you’ll need, different testing methods, and how to interpret the results. By the end, you’ll know how to keep your battery in check and avoid those frustrating “won’t start” moments.
Why Battery Testing Is Important
Motorcycle batteries don’t last forever. Their performance naturally declines over time because of chemical reactions, riding habits, and temperature fluctuations. Unlike fuel, you can’t easily see how much energy is left. That’s why regular testing motorcycle battery health is essential.
Testing helps you:
- Detect weaknesses before they cause breakdowns.
- Save money by avoiding unnecessary replacements.
- Keep your lights, ignition, and safety features working correctly.
- Extend the lifespan of the battery.
- Maintain peace of mind during long rides.
It's not just about starting the engine. Your headlights, turn signals, and brake lights all depend on a healthy battery. If it starts to weaken, your lights may flicker or dim, putting your safety at risk—especially at night or in poor weather. In short, testing motorcycle battery health protects both your bike and your safety.
Signs Your Motorcycle Battery Needs Testing
Even without specialized tools, your motorcycle often gives warning signs that the battery is weak or failing. Watch for these indicators:

- Slow engine crank – If your bike takes longer than usual to start, the battery may be struggling to supply enough power.
- Dimming Headlights – Flickering or dimming lights while idling suggest a low charge.
- Frequent Jump Starts – If you need to boost your bike often, the battery likely needs replacement.
- Unusual Electrical Issues – Malfunctions in indicators, horns, or displays are often linked to battery problems.
- Age of the Battery – Most motorcycle batteries last 2–5 years; after this, regular testing becomes more important.
Recognizing these signs early makes testing motorcycle battery condition a proactive step rather than a last-minute fix.
Tools You'll Need for Battery Testing
Before beginning, gather the right tools. They make the process faster and more accurate:

- Digital Multimeter – Measures motorcycle battery voltage and provides the most reliable results.
- Battery Load Tester – Simulates real-world electrical demand.
- Hydrometer (for lead-acid batteries) – Checks the electrolyte's specific gravity.
- Smart Charger – Charges and sometimes diagnoses battery condition.
- Protective Gear – Gloves and goggles keep you safe when handling batteries.
With these tools, you can perform testing motorcycle battery health with confidence.
Key Parameters for Testing
When checking a battery, mechanics and riders usually measure several performance factors. Each one gives insights into overall health:
- Voltage – Shows the current charge level. For a 12V motorcycle battery, a fully charged state should be about 12.6–12.8V. Anything lower suggests weakness.
- Cold Cranking Amps (CCA) – Indicates the battery’s ability to start the engine. A good battery should deliver enough amps during startup, usually around 300 CCA for most bikes.
- Specific Gravity – Relevant for lead-acid batteries. This checks the electrolyte’s concentration. Healthy batteries show a reading between 1.265 and 1.280.
- Capacity – The amount of energy the battery can hold. Over time, capacity decreases, and testing reveals whether it’s nearing the end of its life.
Monitoring these values ensures testing motorcycle battery gives you accurate information about its condition.
Read What Does CCA Mean On a Battery
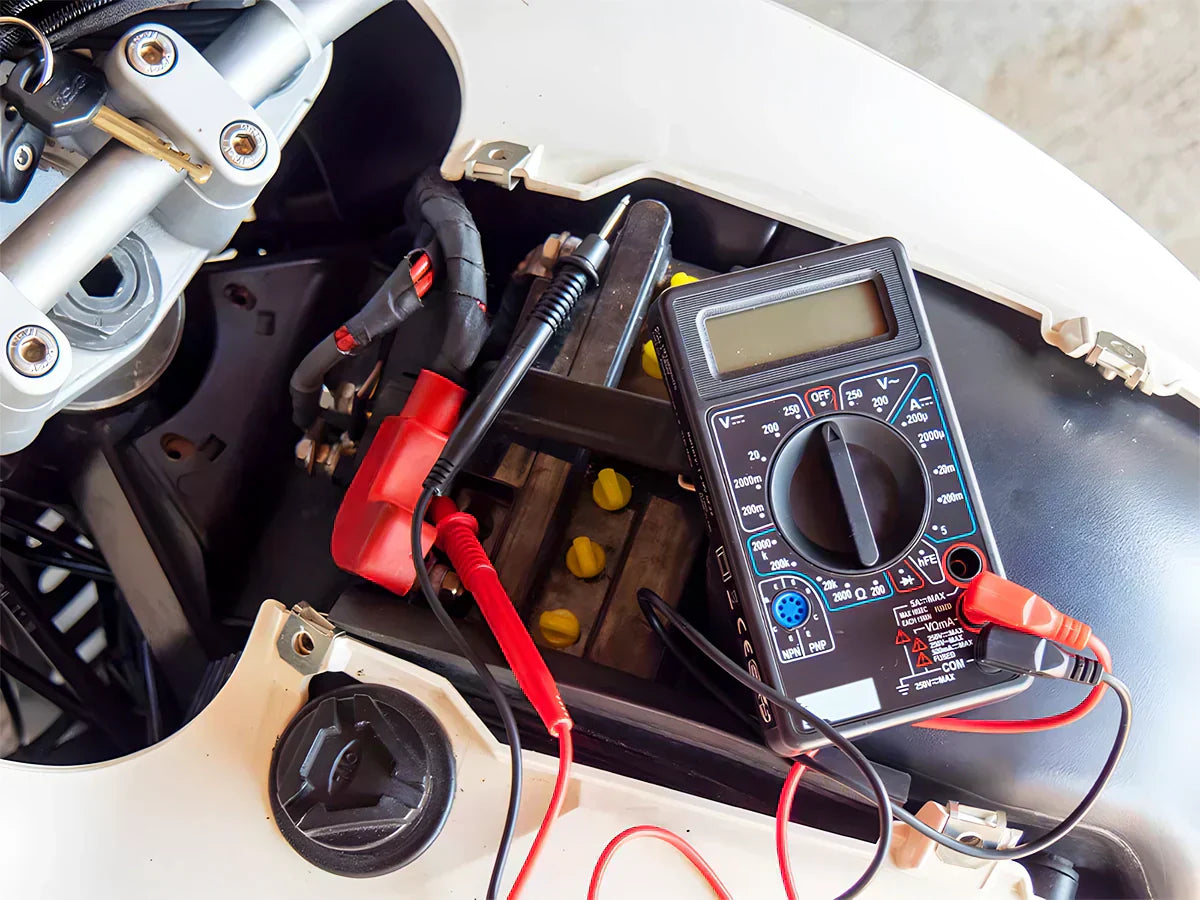
Step-by-Step To Testing Motorcycle Battery with a Multimeter And Understanding the Results
The most reliable and beginner-friendly way to evaluate your motorcycle battery is by using a digital multimeter. This tool not only measures the battery's voltage but also helps you determine whether it can still deliver enough power under load. Here’s a step-by-step process:

1. Preparation
Turn off your motorcycle completely, making sure the ignition and lights are off. For safety, especially with lead-acid batteries, wear protective gloves and goggles.
2. Access the Battery
Remove the seat or panel that covers the battery. On most modern motorcycles, this compartment is easy to reach.
3. Set the Multimeter
Switch your multimeter dial to DC voltage (V). If your device isn’t auto-ranging, choose the 20V range.
4. Connect the Probes
- Place the red probe on the positive (+) terminal.
- Place the black probe on the negative (–) terminal.
5. Measure Resting Voltage
- A healthy, fully charged 12V battery should read between 12.6V and 12.8V.
- A reading of 12.4V–12.5V means the battery is partially discharged but still usable.
- A range of 12.0V–12.3V indicates weakness and suggests recharging or possible replacement soon.
- Anything below 12.0V signals a critical state, where replacement is usually necessary.
6. Perform a Load Test (Optional)
While keeping the probes connected, press the starter button. The voltage should not drop below 10V during this test. If it does, the battery can’t supply enough power under load, and replacement is recommended.
7. Specific Gravity Check (For Lead-Acid Batteries)
If you’re working with a traditional lead-acid battery, you can also use a hydrometer:
- 1.265–1.280 = fully charged and strong.
- 1.230–1.260 = weak, nearing end of service life.
- Below 1.230 = replacement required.
By following these steps and interpreting the results correctly, you’ll have a clear picture of your battery’s condition. This makes testing motorcycle battery performance not only easy but also highly effective in preventing unexpected failures.
Quick Reference Table – Voltage vs. Battery Condition
| Voltage Reading (12V Battery) | Battery Condition | Action Recommended |
| 12.6V or higher | Healthy, fully charged | Ready to use |
| 12.4V – 12.5V | Partially discharged | Recharge soon |
| 12.0V – 12.3V | Weak | Recharge or prepare to replace |
| Below 12.0V | Critical | Replace battery |
How Swap Stations Test Motorcycle Batteries?
In areas where swappable battery for motorcycles is growing rapidly, TYCORUN battery swap stations play a key role in keeping riders on the road. These stations use automated systems to test and maintain electric motorcycle battery efficiently, ensuring every pack is safe and ready for use. The process usually involves:

- Visual Inspection – Automated or manual checks look for cracks, leaks, or corrosion that could affect performance.
- Digital Monitoring – Advanced cloud-based systems measure voltage, current, and temperature in real time, offering accurate diagnostics.
- Charge and Discharge Tests – Stations verify whether a battery can properly accept, store, and deliver energy under load.
- Maintenance Reviews – Connectors, cables, and the overall system are checked to guarantee seamless swapping and safety.
By combining these steps, TYCORUN battery swap stations provide consistent and reliable results, making large-scale testing motorcycle battery packs faster, safer, and more convenient for riders.
Testing with a Battery Load Tester
A load tester provides a more realistic insight into your motorcycle battery’s condition by applying a controlled load and showing how well the battery responds under stress. To use it, simply connect the tester clips to the battery terminals and apply the load for about 10–15 seconds.
A healthy battery should maintain a voltage above 9.6V during this test. This method complements standard multimeter testing and is particularly useful if you suspect deeper issues that aren't immediately visible through voltage checks alone.
Common Mistakes to Avoid When Testing
- Not Charging Before Testing – A half-discharged battery may look weak but could still be healthy. Always test after a full charge.
- Using Incorrect Tools – Cheap testers may give misleading results. Invest in a quality multimeter.
- Ignoring Safety – Never test near open flames or sparks. Batteries can release flammable gases.
- Skipping the Charging System Test – A battery may appear weak if the alternator isn’t recharging it properly.
- Overtesting – Repeated unnecessary load tests can stress the battery.
Avoiding these errors makes testing motorcycle battery safer and more reliable.
Conclusion
Your motorcycle’s battery is the heart of its electrical system. A weak or failing one doesn’t just cause starting issues—it affects lights, safety features, and your riding experience. Regularly testing motorcycle battery health helps prevent breakdowns, saves money, and keeps your rides worry-free.
With the right tools, basic knowledge, and a little routine care, you can easily test your battery at home. Whether you’re planning a road trip, storing your bike, or just doing monthly maintenance, testing ensures your motorcycle is always ready to roll.
Related Articles: Lithium motorcycle battery, How to charge a motorcycle battery, Motorcycle battery replacement